

December 11, 2009
Sand Dunes Hat
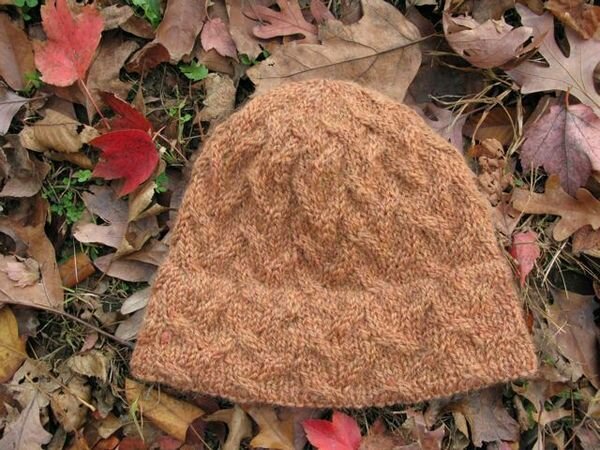
For my mom's birthday, I made this simple cabled hat. With only a single skein of 126 yards, there wasn't enough yarn for a folded brim or a complex cable pattern. but I wanted something a bit more interesting than a plain stockinette hat. I decided on wavy, subtle cables. Like wind-blown sand dunes..
The Hope Spinnery wind-spun yarn is lovely. It varies a bit in how twisted the plies are. I just loved knitting with it. I've started spinning and maybe someday I can spin a yarn like it.
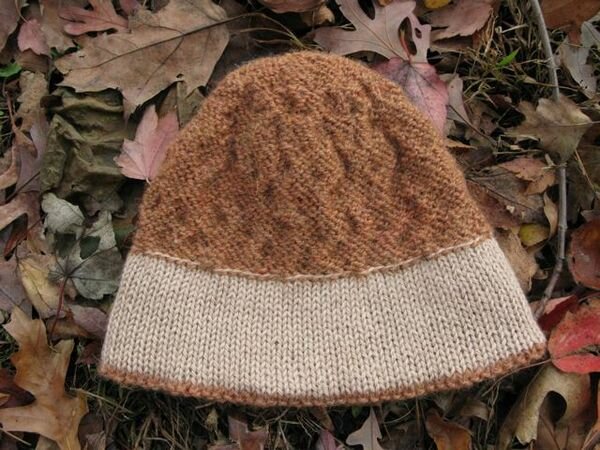
This hat is one of the many lined hats I am knitting this year. I used some dk-weight alpaca on this one. super soft. Lining hats is also one way to use up half-skeins of yarn, and you can employ a non-wool for those sensitive to itchiness. When using partial skeins, I usually let the amount of lining yarn determine the height of the liner, and knit until the yarn runs out. no leftovers = good.
I may have succeeded on adding this pattern to ravelry. Hrm, how to get a photo on the sand dunes hat ravelry page?
Pattern after the jump.
Sand Dunes Hat Pattern:
Yarn:
1 skein Hope Spinnery Wind-Spun Yarn, in Roughy
1 skein Alpaca with a Twist Baby Alpaca, or other dk-weight yarn you have hanging around.
Gauge: 5 stitches per inch in cable pattern.
Needles: Size 7 and size 5 16-inch circulars
Cable Pattern:
row 1: *cable 4 front, k4* around
row 2, 3, 4: Knit
row 5: *k4, cable 4 back* around
row 6, 7, 8: Knit
Need help cabling? These look like good cabling instructions
Cast on 88 stitches with the lining yarn and the smaller needles, using long-tail cast-on. Join to knit in the round. Knit in stockinette for about 3 inches, or desired height.
Switch to main yarn and larger needles. Knit one round. Purl one round (this is the turning row). Knit 4 rounds. Begin cable pattern. Repeat cable pattern until the height of the hat from the turning row matches the height of the lining. Try to avoid ending on row 4 or 8 of the cable pattern (because then you'd have to knit in the liner while doing a cable cross).
Weave in all your ends so far. Once the lining is knit in, there will be no getting at those ends!
Join the lining to hat body: Using the size 5 needle (or an even smaller one if you have it on hand), pick up the loops from the cast-on row. You should end up with about 88 stitches on the needle. Fold the hat at the purl turning row and line up the two circular needles. This is a good opportunity to see if the heights match. Knit a row or take out a row until they do. Then, holding the two needles together and still working with the main yarn, for the next round knit together one stitch from each needle. If you are off by a stitch at the end, no big deal. The lining is in!
Keep knitting in pattern to 6.5 inches or desired height, ending on an odd row.
While working the decreases, you have two options - either abandon the cable pattern and work the top of the hat in stockinette, or work the decreases into the cable pattern. You'll probably end up at a different point in the cable pattern than I did, so use your knitting brain to keep the cable pattern going. For example, is you are decreasing on round 4 of the cable pattern, do the decreases as normal. Then when you come to row 5, do a 3-stitch cable cross instead 4. Barely noticeable. You can also move around the point in the round where you do the decreases, just make sure to do one decrease per 8-stitch original cable repeat. Try to do 2 cable crosses after starting the decreases.
Decreases:
round 1: *k6,k2tog*
round 2 and all even rows: Knit
round 3: *k5,k2tog*
round 5: *k4,k2tog*
round 7: *k3,k2tog*
round 9: *k2,k2tog*
round 11: *k1, k2tog*
round 13 and 14: k2tog around
Break yarn and thread it through remaining stitches.


Comments (3)
Awesome. I love it! And the lining is brilliant. I have a lot of half skeins in a jar in my craft room. I'll remember this trick on the next hat I make, and plus, in my climate a little extra warmth around the ears is just what you need.
Posted by Stephanie | December 11, 2009 12:10 PM
Posted on December 11, 2009 12:10
I like these cables, and the long hem on the inside of the scarf. I bet that it keeps mom's ears very warm.
Posted by colleen | December 11, 2009 12:17 PM
Posted on December 11, 2009 12:17
Hi Diana, beautiful work! May we use your photo on our website (of course with a link to your blog)?
Thanks,
Olga
Posted by Hope Spinnery | December 19, 2009 10:10 AM
Posted on December 19, 2009 10:10